
When it’s time to talk about regaining control of personal data, e-mail are on the top of my list.
I have never trusted Google to deal with my data (my photos, my e-mail, or my documents). Even if I admit Gmail offer a very convenient service and a wonderful anti-spam (thanks to all the data shared by 1.5 billion active users and their 10 millions of spam and malicious emails received every minute).
This guide will help you to recover control of your e-mail.
When your business relies on digital exchanges, your e-mail provider must be very reliable. A chance that the Simple Mail Transfer Protocol is robust, allowing your precious e-mail to be retransmitted in case of outage of a gateway. In fact, a gateway could be off-line during days before the e-mail would be returned to its sender.
By the time, in addition to SMTP, other protocols and standards has been added to provide a complete e-mail service:
- IMAP (used by your client to retrieve e-mail from the server)
- TLS/SSL (for security and privacy)
- SPF, DKIM and DMARC (to authenticate senders and fight against phishing and spam)
- Sieve (to define filtering rules)
Hey! I don’t want to build a rocket. I just need an e-mail service that respect my privacy.
Answer is simple: rely on a service provided by a recognized European entity (respecting GDPR, which is normally mandatory). In short, you can trust OVHcloud e-mail solutions.
Let’s do it!
For fun or if your needs are a bit specific, you can also do it yourself.
In my all life, I have built 3 times a complete e-mailing system for my personal use. Obsolescence of the underlying Debian system, and therefore security, was the main driver. This last time, I defined these requirements:
- Operating System abstraction (ie I can easily upgrade/change the OS without risking a major impact on the e-mail application stack)
- Sustainable Open-Source community supporting the entire stack
- Hardware abstraction
Docker to the rescue
Looking for a stateless e-mail stack, I have rapidly identified docker-mailserver as a good candidate. Anti-spam is based on SpamAssassin (a personal choice based on my experience) and configuration is very simple (no web interface, no additional dabatase, KISS)).
If docker-mailserver does not fit you, have a look at those alternatives: mailcow or Mailu.
This (almost) stateless approach enables to easily upgrade or downgrade the VM (vertical scaling).
Requirements
Basic configuration
1 CPU
2 GB RAM + Swap (or 3 GB if you don’t want to use swap)
8 GB Storage for System and Container (don’t forget to add the Swap size if you need it)
+ Storage for e-mail accounts
ClamAV is memory consuming (more than 800MB for the virus signature database). If you don’t run ClamAV (for example if you use another ant-virus or gateway), you should be able to run with 512MB of RAM.
Advanced configuration
For e-mail accounts storage, my first thought was to use Object Storage but I was not able to find any Open-Source IMAP server. Then I have decided to go with a scalalable Block Storage solution (like Ceph-based OVH Block Storage).
For SMTP output, IP reputation is very important. Default VM’s IP does not seem to be a convenient choice. My preference goes to ‘Static’ IP (like an OVH Fail-Over IP). Another advantage is I could decide to replace the VM while keeping the same IP.
Step by step, using OpenStack-based OVH Public Cloud
I assume a new Public Cloud Project has been created, and you have downloaded the OpenRC environment file.
First, load the environment: source openrc.sh.
1. Instanciate a VM
If needed, push your SSH public key to OpenStack region openstack keypair create --public-key ~/.ssh/id_rsa.pub mykey
We can not purchase any IP without a running instance. So we will instanciate the VM without any OS:
# Download cloudinit script that will help later to setup our VM |
The cloudinit script will update the system, install packages for docker and unbound, and configure network with local dns and the static IP.
2. Purchase a ‘Static’ IP
Using Customer Interface (you can follow the guide):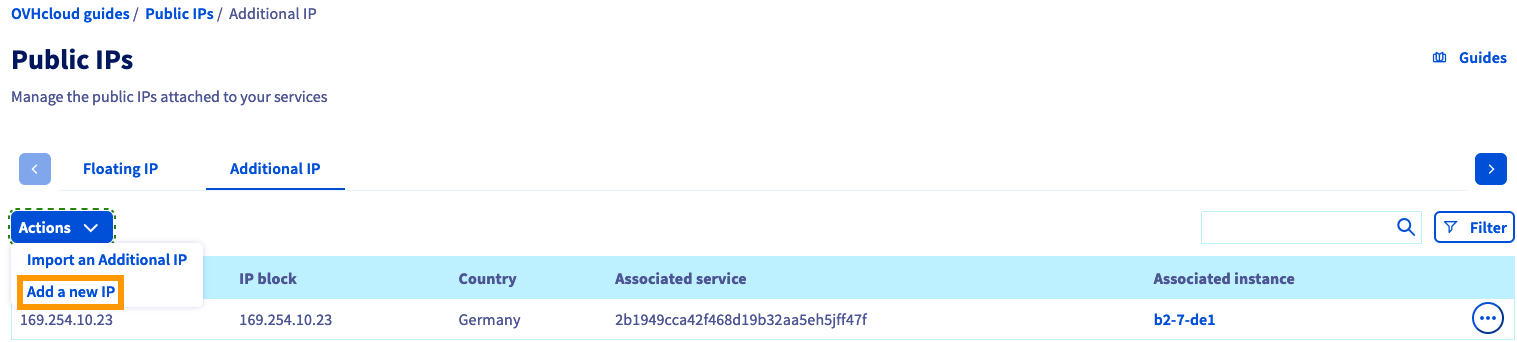
And assign it to the VM named email.
3. Add Block Storage
There are two types of block storage: classic and high-speed (openstack volume type list). Performances of classic storage seems acceptable for an entry level mail gateway.
Create a 10GB volume and attache the volume to the instance:
# Create the volume |
4. Build the VM
Pass the Static IP as meta-data (replace 1.2.3.4 with your own IP) and build the VM:
openstack server rebuild --property static_ip=1.2.3.4 --image "Ubuntu 18.04" email |
5. Setup Storage
Connect to the VM: ssh ubuntu@1.2.3.4
# LVM setup |
6. Configure local DNS resolver
Many Anti-spam blacklist systems rely on DNS, some of those blacklists rate-limit can be exceeded when using mutualized DNS resolver (your provider or global anycast like Quad9). Using your own local resolver with your Static IP would solve this issue.
Configure unbound to allow local resolution and use the Static IP for external request (replace 1.2.3.4 with your own IP):
1 | server: |
Configure Systemd to start Unbound after Docker service: sudo systemctl edit unbound.service:
1 | [Unit] |
Reload service: sudo systemctl reload unbound.
To test your local DNS resolver, you can use a DNS reflector (like DNS Paranoia) and check it answers your Static IP:
$ dig +noall +answer reflect.dnsp.co |
7. Generate Let’s encrypt SSL certificate
To generate certificate, run:
sudo docker run --rm -ti -v $PWD/log/:/var/log/letsencrypt/ -v $PWD/etc/:/etc/letsencrypt/ -p 80:80 certbot/certbot certonly --standalone -d mail.mydomain.com |
9. Configure firewall
Review the rules, then copy and apply:
sudo curl -o /etc/iptables/rules.v4 https://raw.githubusercontent.com/gmasse/emailgw/master/etc/iptables/rules.v4 |
Do not restart the service
iptables-persistentbecause it will overwrite the Docker default rules and prevent from accessing the container.
10. Configure the container
Download the configuration files:
sudo mkdir /mnt/mail/docker-mailserver |
Update env-mailserver according to your setup (OVERRIDE_HOSTNAME and POSTMASTER_ADDRESS).
By default, docker-mailserver uses
Maildirformat for mailboxes. This is a very common format where each e-mail is stored in one file. For better performances and/or to use Alternate storage, you can rely on Dovecotsdboxandmdbox(supported since the merge of my pull request).
Update and save .env file:
1 | HOSTNAME=mail |
11. Run it
Create at least one e-mail account: sudo ./setup.sh email add <user@domain> [<password>]
Then launch the container: sudo docker-compose up -d mail
12. To go further
Generate DKIM keys
Automatic update of the container
To be continued…
Let’s encrypt SSL auto-renew
Coudinit: add storage and dns configuration
Tiered storage, using Dovecot Alternate storage feature: recent emails on high-speed block storage, archives on normal speed
Volume (auto?) resize
IPv6
E-mail configuration auto-discover